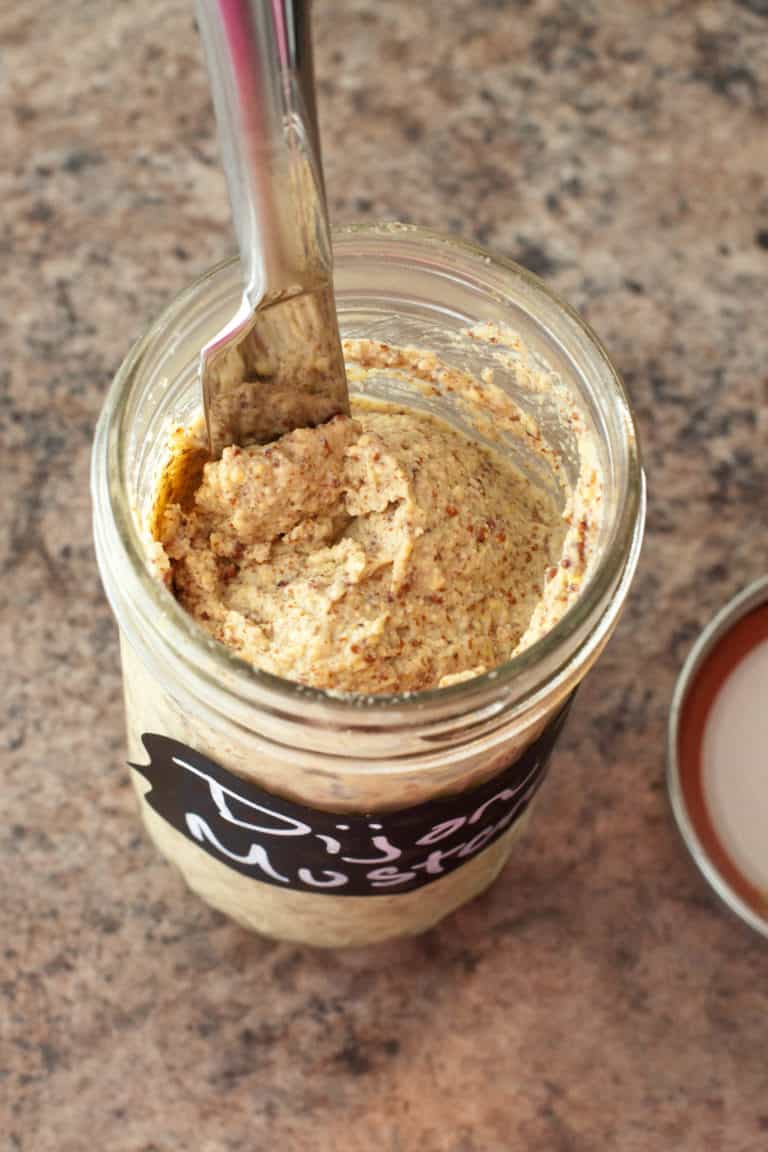
Cream Cheese From Scratch


Thinking about making your own cheese? This is a great one to start with! It only takes a few ingredients and some little time to can make your very own homemade Cream Cheese From Scratch! – Newly updated with a smaller, easier-to-make amount!

What’s at the heart of from-scratch cooking? Cheese, of course! One of the easiest cheeses you can make yourself is homemade Cream Cheese From Scratch! It takes just a few ingredients and you can have the creamy dreamy perfect bagel pairing rich cheese.
Ingredients Needed:
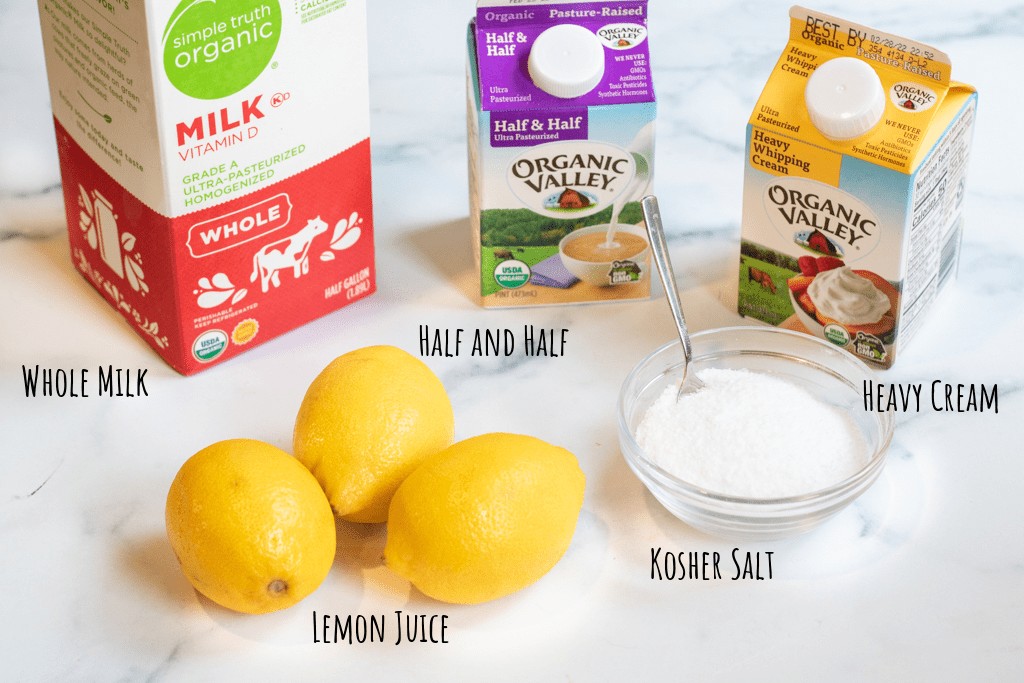
- Whole Milk – For this, you really want “regular” milk from your favorite grocer. Farm fresh (straight from the cow) don’t quite work for this recipe.
- Half and Half and Heavy Whipping Cream – This is what adds the “cream” to the cream cheese.
- Lemon juice – Fresh is what we always use, but a bottled juice is totally fine, too!
- Salt – Kosher is always our preferred for cheese making because it is the purest form of salt.
Ok, so I know that ingredient list is expensive. You can totally just use all whole milk, too but that will make really more of a Ricotta Cheese. What separates Ricotta from Cream Cheese? Cream. By using the heavy cream and half and half, you will get a much richer tasting, creamier cheese.
Equipment Needed:
- Cheese Cloth
- Sieve or colander
- Large Pot
- Thermometer
Step-by-Step Instructions
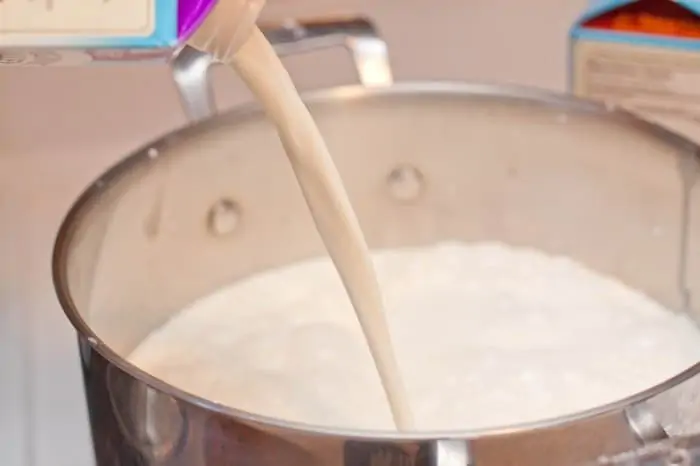
- Add milk, cream, and salt to pot and slowly heat
- Heat to about 165 – 170 degrees.
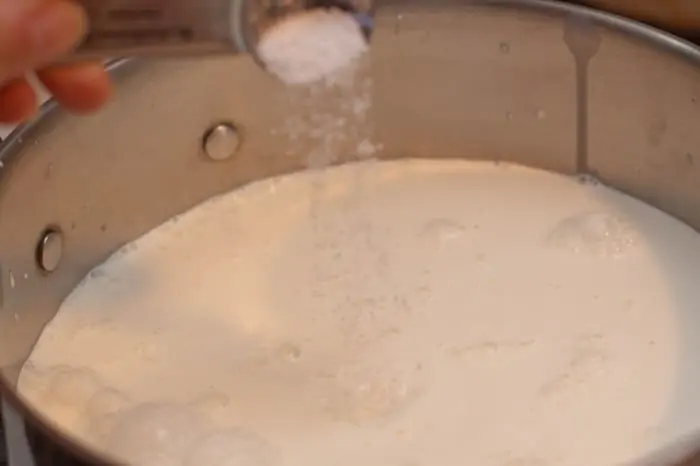
- Add lemon juice and give a stir.
- Continue to heat for a couple of minutes then remove.
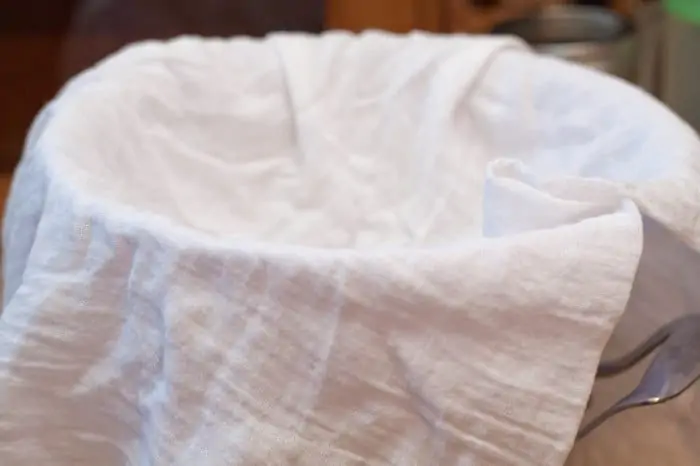
- Line a colander with a cheese cloth
Tip: Definitely make sure you have a big cheesecloth that it covers the sieve or colander fully and will give you enough to gather all of the edges.
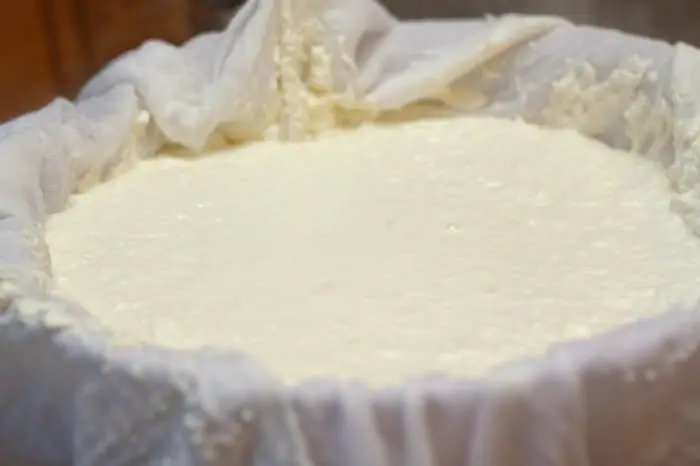
- Scoop / Pour curds into the the cheese cloth.
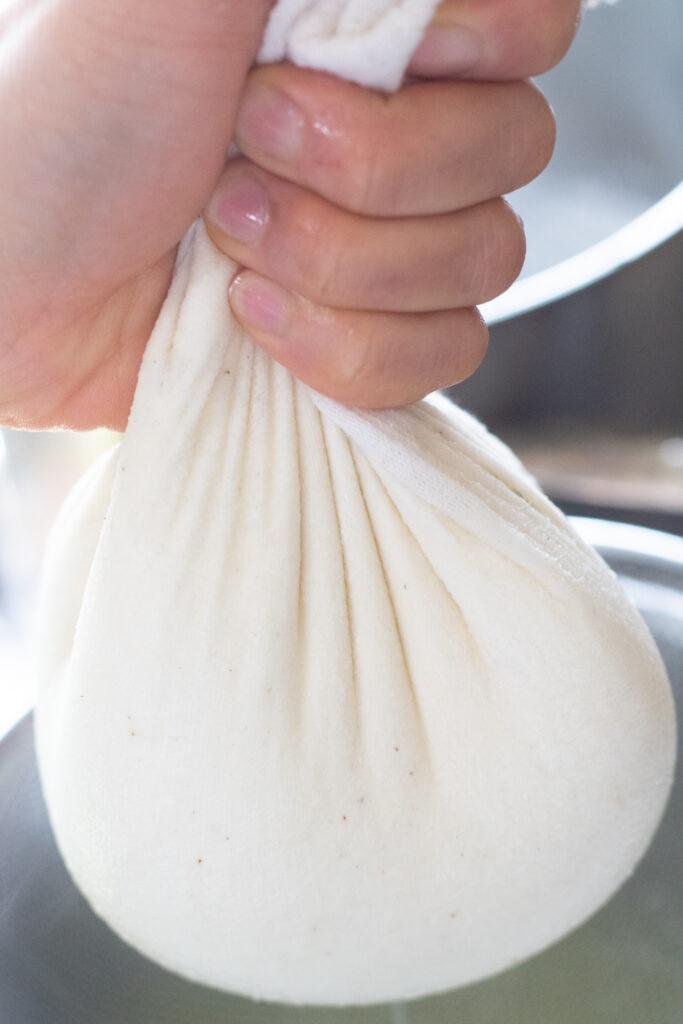
- Gather ends of the cheese cloth and let drain.
And done!
Tip: We’ve let this drain as little as 1-2 hrs and as much as 24. If leaving it out to drain more than 3-4 hrs, let it drain in your fridge or in a very cool place.
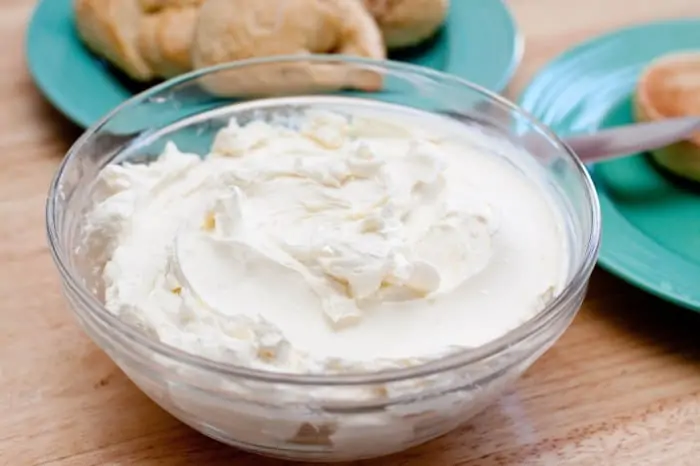
Once it’s drained, you have a super creamy, delicious cream cheese from scratch! Who known homemade Cream Cheese From Scratch was so easy!
Tips for Making Cream Cheese:
- Keep the ratios of milk to cream and half and half. You can use just milk, but if you want to use cream and half and half, keep to these ratios.
- Rinse your pot with cold water, first. This will help with the clean up after!
- Use a Thermometer. This will help ensure that you’re not overheating your milk and help prevent you from burning it.
- Make sure you have a good cheese cloth. Be sure that it’s one that’s wide so when you line your sieve or colander so that you have enough room to gather it all to hang to drain.
- Hang it for faster draining. You can just let it drain while in the sieve/colander, but gathering the edges of the cheese cloth and suspending it will help it all drain faster. Plus, doing this will allow you to gently squeeze the cloth a bit to release liquid faster.

Now that you have this Cream Cheese, you can make this amazing Cream Cheese Frosting From Scratch!
FAQs
If you overheat your milk, you’ll end up with a kind of gritty cheese. It’ll be smooth but it will have a grainy texture because the protein is denatured.
Totally. I think that it’s a little less creamy and will make a cheese that’s more like ricotta, but just using milk is still delicious!
No problem, use a mixture of half and half and heavy cream that you have, as long as the two are the majority (and ideally 2x the milk).
The separation of the curds and whey for this recipe won’t be as distinct as another cheese like mozzarella. Often, they’re very soft and cloud-like with not a lot of distinct whey and curd separation. Even if it seems like distinct curds have not formed, continue with draining.
We find the best results with 2-4 hrs. but if you want a looser, wetter cheese, then drainer for a shorter period.
It’s best to use this cheese within a week of making it.
Yes, you can. However, it will change the texture. So it won’t be great for spreading on bagels, but it’ll be great for baked goods. Just be sure to wrap it in foil and store in the freezer for up to 2 months.
As always, if you do please let me know!! I love to hear about it on Facebook, Instagram, and Pinterest!

Cream Cheese From Scratch
Equipment
- large spoon
Ingredients
- 1 cup whole milk
- 1 cup half and half
- 2 cups heavy cream
- 5 tablespoons lemon juice
- 1/2 teaspoon salt
Instructions
- Line a large sieve or colander a large cheesecloth and position over the sink or over a large bowl or pot if you plan to use the whey later. Be sure that your cheese cloth hangs quite a bit over the edges of the sieve – plenty for gathering when you drain.
- Rinse a large pot with cold water. Add milk, half and half, and creams and salt to the pot and heat over medium heat. Heat to approximately 165°-170° F, approximately 5-6 minutes.
- Stir in the lemon juice and continue for a minute or two. Curds will begin to form and float to the top and the milk/cream will begin to simmer a bit and a gentle foam will start to form. Soft curds will start to form, but they won't be as firm as curds from mozzarella, they'll be much softer and cloud-ike. Once you start to see them form, turn off heat and let it sit for another minute and then remove from heat.
- Let sit for 2 minutes and then use a large spoon to gently scoop curds into the cheesecloth, and then slowly and gently pour the rest of the curds/whey into the cheesecloth. Note: The curds will often seem very soft and cloud-like and it may seem like they're not scoopable. If that's the case, just gently pour into the cheesecloth and allow to drain.
- Gather edges of the cheesecloth and suspend over kitchen faucet or just let drain in the cheesecloth lined sieve/colander. You can give the wrapped cheesecloth a gentle squeeze or release some of the whey. See recipe notes.
- Let drain for at least an hour and up to four.
- Gently open cheese cloth and turn cheese into a large bowl. If it seems a little loose still, that's ok it will thicken a little more in the fridge as it chills.
- Cover bowl with plastic wrap or add to an air tight container and let cool for at least 2-4 hrs, this will help it thicken.
- Store in fridge for about a week or in freezer for up to 2 months.


If you want to waste money then use this recipe!! I strain the end product through many layers of cheese cloth and i got absolutely nothing. I came back to an empty cheese cloth everything just drained out.
Hi Veronika! I’m so sorry this happened, I get how frustrating it is to waste ingredients. It sounds like something went amiss during the curdling process as if any curds were formed, you would have been left with cheese in the cheese cloth. I’m so sorry again that this happened!
I tried this recipe today, my first time making cream cheese and judging by the way the curds taste I will be pleased with the flavor. I do have a question regarding the whey. Mine is a very white milk like liquid. Pictures I’ve seen the whey is a semi-clear liquid. Should I have done something different? Also the curds are very small, but I’ve seen other comments about similar size. Thanks for any recommendations for my next batch. Incidentally I used 2:1 ration of 3.5% milk to 35% heavy cream
For any one out there wondering if this recipe can be made dairy-free, the answer is yes! I tested a smaller batch using 1 cup of soy milk and 1 cup of soy cream, a quarter teaspoon of salt, and curdled it using 1.5 tablespoons of lemon juice, and 1 tablespoon of white vinegar (2.5 tablespoons total). I didn’t get very large curds, but after slowly passing the mixture through a cheesecloth, the curd separated from the whey perfectly. I let the mixture drain overnight and ended up with a very dense cream cheese in the morning (190 grams total or about 7 oz), which I put in my vitamix to smoothen out. The texture is perfect, and so is the taste! It has that distinct cream cheese like tanginess! Thank you so much for this recipe! Adding cream, even non-dairy cream, makes a huge difference!
Wonderful to hear, Nicole!! Thanks so much for taking the time to share your notes!!
Soy milk is unhealthy.
1/2 n 1/2 was left out of ” add to pot.”
Ah, thank you, Anne, I did add that half and half. Sooo are you giving 3 stars for your thoughts on soy milk, the missing half and half, or did you actually make the recipe?
I’ve tried this recipe twice now. The first time I didn’t get any (large) curds and was very discouraged…..but I saw a lot of others had the same problem so I decided I hadn’t ruined it. I did try to strain it in my yogurt strainer and it didn’t work so well. I’m going to stick with the nut bags I have. The cream cheese was a beautiful consistency but I thought I needed a little more salt.
My second try was not so great….I only have myself to blame. I let the milk/creams come to a simmer and it was a mistake as my cream cheese was grainy. I did put more salt in the second batch so it was much tastier but the texture was off, Once again I didn’t get any real curd separation so I kept the mixture in the pot and let it come down to room temperature and then I put the pot into the frig. After the mixture cooled down I then put it into a nut bag and put it back into the frig to finish. It turned out great for taste but the grainy is hard to get past. I’ll keep trying until I perfect it …..I’ve mastered yogurt so cream cheese is next!!! I really like this recipe. It’s easy to follow and makes really good product. Thanks!
I live in Argentina, and Philadelphia cream cheese is not imported or available very often. But I needed it for carrot cake topping.
I used 2 cups of 3 percent fresh milk (sold in bags, the milk in plastic bottles is “long life” and I don’t know what the manufacturer has done to get a long shelf life). I used 330 ml of 20 percent fat cream (“para cocinar”) and the balance to bring to two cups total cream I used 36 percent fat (“para batir”).
At first I didn’t think it made a curd, but it turned out the curd was just so tiny it seemed like it was just cream. The point is that you just need to follow the recipe and not look for curds.
Cheesecloth is also hard to find here. So I used a cut up t-shirt for the filter. After about an hour I changed the filter to some very open weave cloth that I believe is a cheap cheesecloth I must have bought years ago.
After a few hours, I still wanted a dryer cheese, so I left it in the fridge and went to bed. In the morning it was all good! I got about a cup of product. It was good texture and taste. If anything, it was a little dense.
When I went to make the carrot cake glaze, I added a squeeze of lemon juice to give it a little more moisture. The cheese, butter, powdered sugar, and vanilla topping got creamier after some heavy stirring. Really came out perfect.
Next time, I might just go with 20 percent fat cream for both cups of cream, and filter for less time, in order to drop the calories and have a less dense cream cheese.
I give these details to let people know that you don’t need to look for curds. And to give Argentine specific ingredients.
Thanks for your recipe.
I posted a comment in February about how well this recipe worked even though a curd didn’t set for me. Since then I wanted to test the traditional method using rennet and sodium chloride……. Lo and behold, I didn’t get a curd to set with that one either. I can’t pay 15$ for a gallon of raw milk so I have no choice but to use what I can find at the store. With the rennet recipe it took 5 days of allowing it to drain at room temp in order to get a very small yield. The whey never separated and almost half of the mix was lost when draining and I was using butter muslin. I was not impressed, so I am sticking with this recipe from now on. Not only is it cheaper, but you can actually get away with using the UHT milk as long as you don’t mind losing the official “curd setting”. The whey will separate, and once you drain your mixture you will be left with a cream cheese texture much like Boursin. I call that a win.
A win indeed, Kelly!! Thanks so much for sharing! <3
I use this recipe as a base for my veggie cream cheese every week. We have our own milking cow and make most of our own dairy products. Thanks for providing a good recipe! I will be sharing the link to it when I post a veggie cream cheese blog tomorrow. 🙂
Ooh veggie cream cheese sounds great! Thanks for sharing, Brea!
This recipe is a big NO from me. I followed the instructions to the letter. I made sure to not buy products that are Ultra High Pasteurized (UHT) and still…no curdles formed. There was absolutely no separation of the whey. I added more lemon juice…nothing. I wasted a good amount of money and effort on this.
I’m sorry, I have to recommend your readers find another cream cheese recipe. This isn’t it.
Hi Kate, sorry to hear that. Like the recipe says, the curds will not be as distinct as mozzarella curds and can be much softer and cloud-like. Did a gentle foam start to form? Did you try draining it into your cheesecloth and letting it drain because perhaps the curds didn’t form quite as you were expecting, but if you completed the full recipe, maybe you would have been surprised by the results. In any case, I’m sorry that wasn’t crystal clear in the instructions, so I’ve updated it with additional notes.
Tracy, you are spot on with your directions and recommendations in this recipe.
I have to say I was skeptical at first, but after trying methods that require more heat and blending with a food processor that doesn’t quite eliminate that gritty texture, had me frustrated.
I brought my mixture to temp slowly, and added a combination of lemon juice and vinegar just because I like the mix. I didn’t think anything was happening, but I looked closer after a few minutes and noticed the tiniest bit of coagulation on my spoon when I tilted the ladle, I could see them slide unevenly through the liquid. The curds were there, they were just tiny. I have been draining it for about 4 hours now and it already has a fantastic flavor and texture! I will be using your tips exclusively for my cream cheese making. Thank you for taking the time to do this!
Kelly! You’re so so sweet to take the time to share this. Thank you so much, so glad that it was helpful and that you enjoyed the results!
To update the earlier comment,
My batch of cream cheese was a fairly good size. It filled a 16 oz container and a little more besides. I gave the extra to a friend, and my family demolished more than half the container we kept and it’s only been 4 days! I had to tell them to save me some.
That’s wonderful to hear, Kelly!
may I ask what ratio of lemon juice and vinegar?
In my opinion, a major mistake that many people new to making cheese and cheese products is to think that “cheesecloth” is the appropriate material through which to strain curds.
Cheese cloth has such an open weave that, in many cases, your curds just pass through and you get nothing.
For decades, I have been using white, 100% cotton handkerchiefs for that purpose. The whey drains out a little more slowly, but you do not lose fine particles of curd in the process.
Sometimes you have to wait up to 30 minutes. Every milk from every cow is different. Sometimes a splash of vinegar will help. The recipe isn’t a dud. Just have to understand how milk products work. 🙂
Same thing happened to me, as I followed the recipe to a * T *.
I was excited to try this recipe, as the rating is high.
I did use 3.25 % milk. even adding more and more lemon juice, not even any small curds.
I will also look for a different recipe, unfortunately.
( I only did half the recipe, thank God I didn’t do the fu recipe, waste of ingredients )
Hi Lorraine, sorry that happened to you, although if you just kept adding lemon juice, that’s not following the recipe to a “T.” Also, as I state in #4 of the instructions “Note: The curds will often seem very soft and cloud-like and it may seem like they’re not scoopable. If that’s the case, just gently pour into the cheesecloth and allow to drain.” Did you try draining it into the cheesecloth?
Lovely, easy, simple recipe with lots of options (read to the end of recipe). No unaccessible products. Came out perfect plus Whey is great for Garlic soup base and lots of other things.
Will be retrying Mozzarella Your way, not to much success with others so far. Thank You
I’m so happy to hear you enjoyed it, Arlette! Thank you so much for taking the time to leave a review. And wow that garlic soup sounds so good. Enjoy the mozzarella and please let me know how it goes!