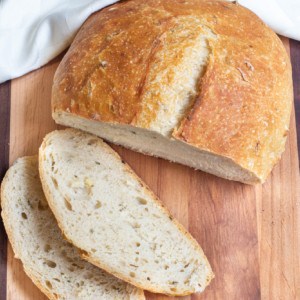
Ready to start making your own bread? Then this No Knead Rosemary Garlic Bread is the perfect, easy, no kneading required bread to start with!
Is there anything more comforting than the smell of fresh baked bread? How about some No Knead Rosemary Garlic Bread fresh baked that requires not a single bit of dough kneading? Nope. There isn't.
That's why this recipe is incredibly easy. It's the perfect intro to bread making and so delicious!
Ingredients Needed

First, just some super simple ingredients.
- Flour - All purpose for this recipe is best. Bread flour will work, but it has more gluten-forming protein which makes a thicker crust and wont create the same open holed crumb that the all purpose makes.
- Yeast - You can also use just regular active yeast or instant yeast, because there will be plenty of time for it to activate and proof, so use what you have!
- Garlic - Fresh, of course! You can leave it whole, mince it, or our favorite is thinly sliced.
- Rosemary - Fresh again is best. But you can totally use dried, see recipe notes.
- Salt - A fine salt like table is best because it will incorporate the best within the dough. You could use a fancy salt like a pink Himalayan, too. Just as long as it's a fine ground salt.
- Water - Warm. At least a little bit and definitely not cold. Remember, yeast is alive! It needs a little warmth to activate, but don't burn it! The best is 90 - 105 degrees, if you have an instant read thermometer it'll take all the guess work out. But basically just lukewarm, that's all your need.
So Easy to Make!
Seriously, this is why it is the perfect introduction to bread making recipe. It is SO incredible easy.
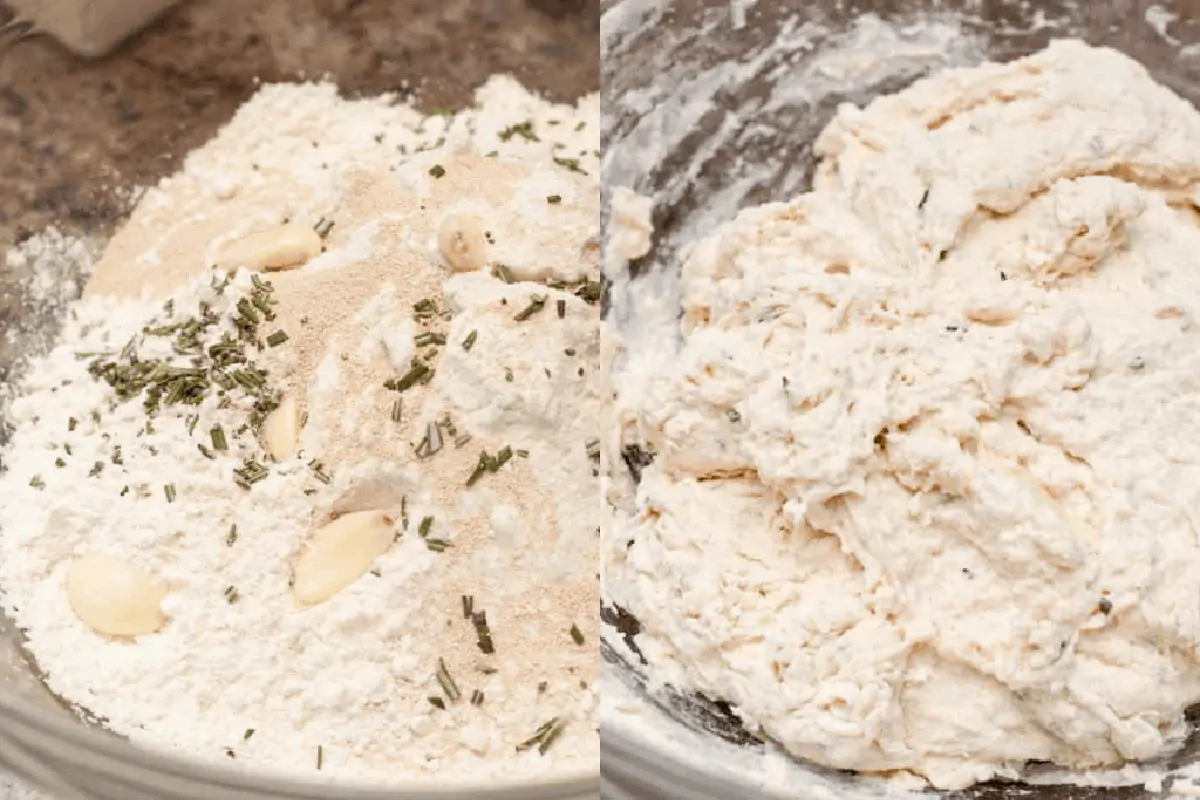
Step 1: Mix everything except water in a large bowl.
Step 2: Add water and mix until you have a very sticky, rough dough.
Tip: Don't worry - it's supposed to be very sticky! And don't overmix it, just mix it until everything is combined.
Step 3: Give it a long rise. Cover it with plastic wrap and then let it sit for at least 6 and up to 12 hrs. This is where the magic happens!
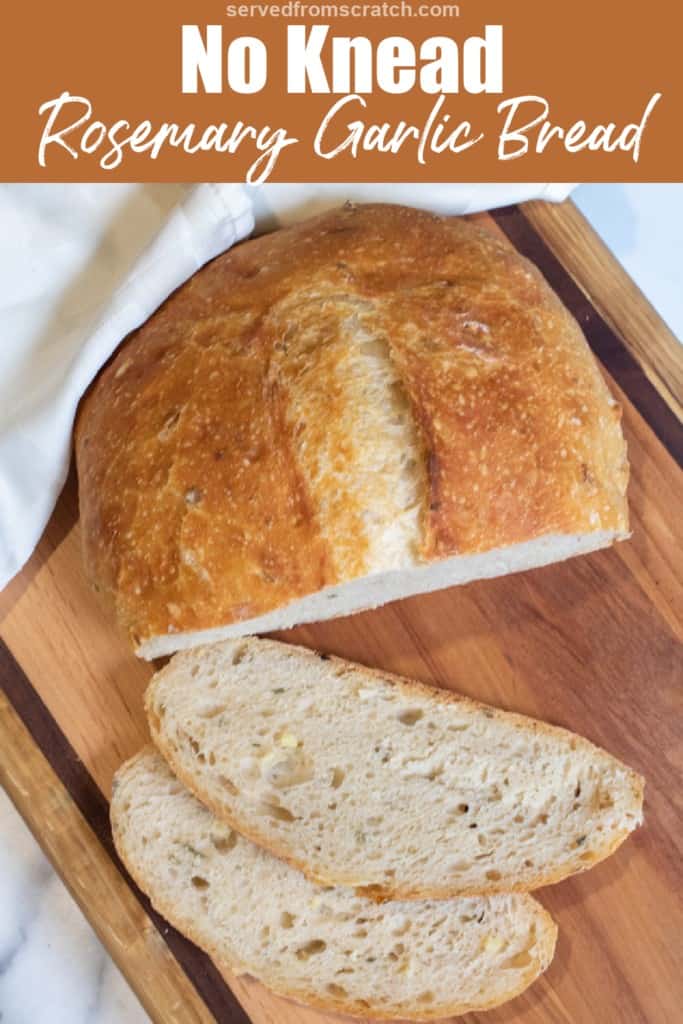
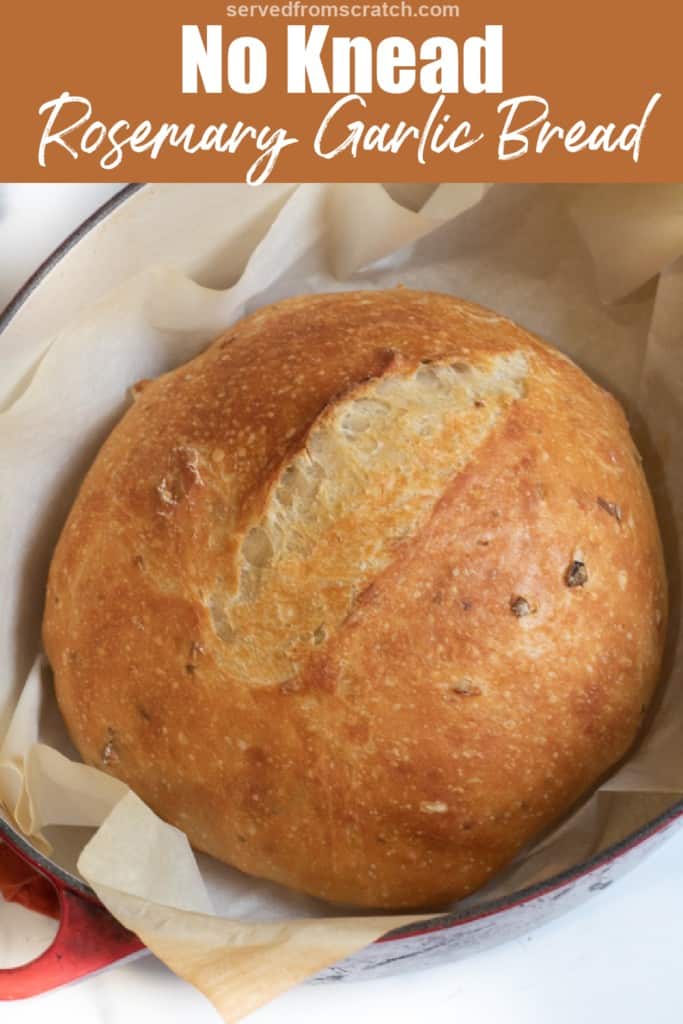
Bake in a boule or sandwich loaf
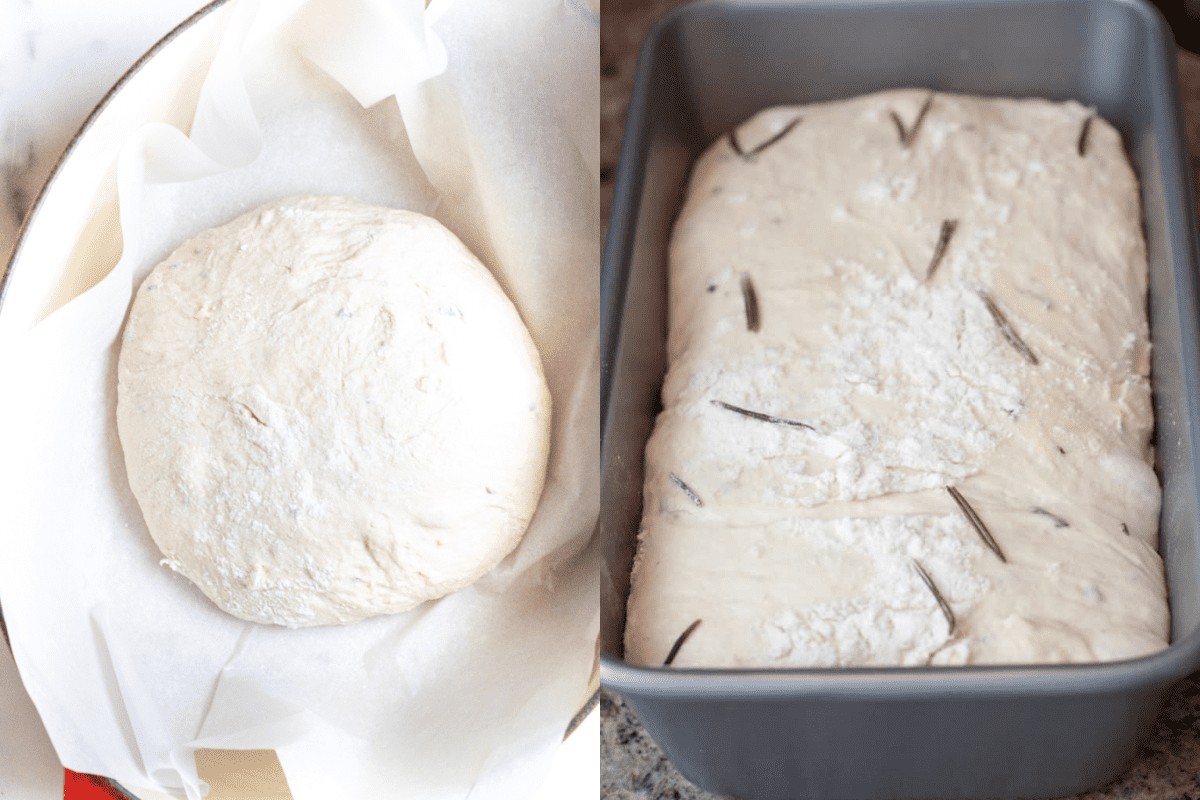
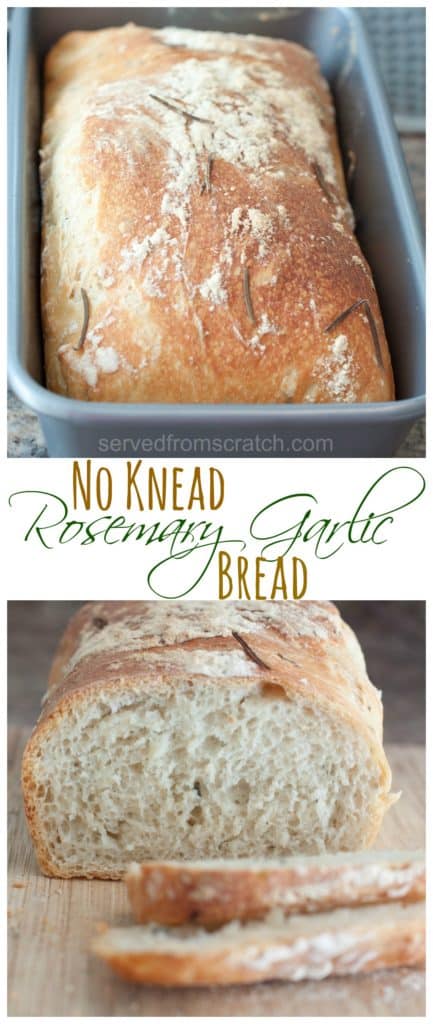
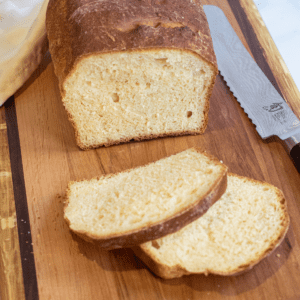
Step 4: Add that dough to either a (greased) loaf pan or a parchment paper-lined Dutch oven to rise again.
Tip: Sprinkle the edges of this wet dough with some flour. This will help you pull it out of the bowl and shape it.
Step 5: Let rise again and add a little more fresh rosemary (if you'd like) on top of your bread and then score it with a bread lame or super sharp knife.
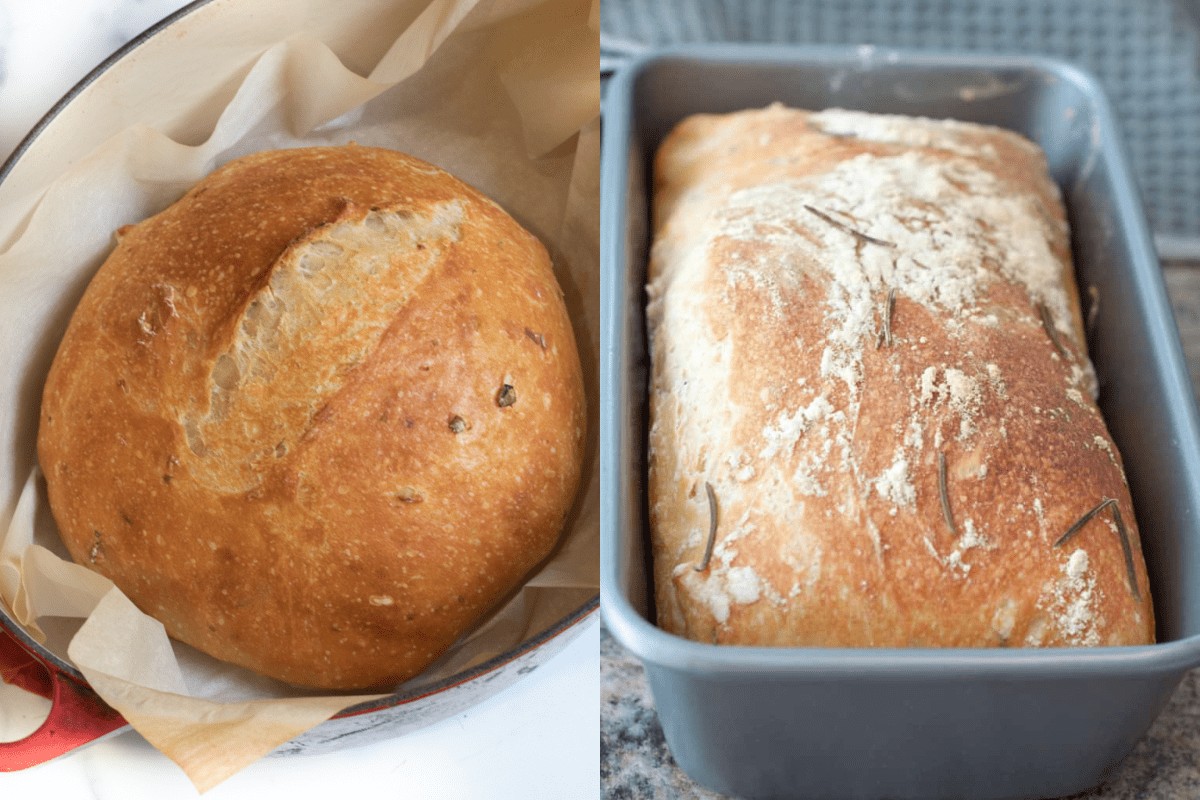
Step 6: Bake! In either a loaf pan or a Dutch oven!
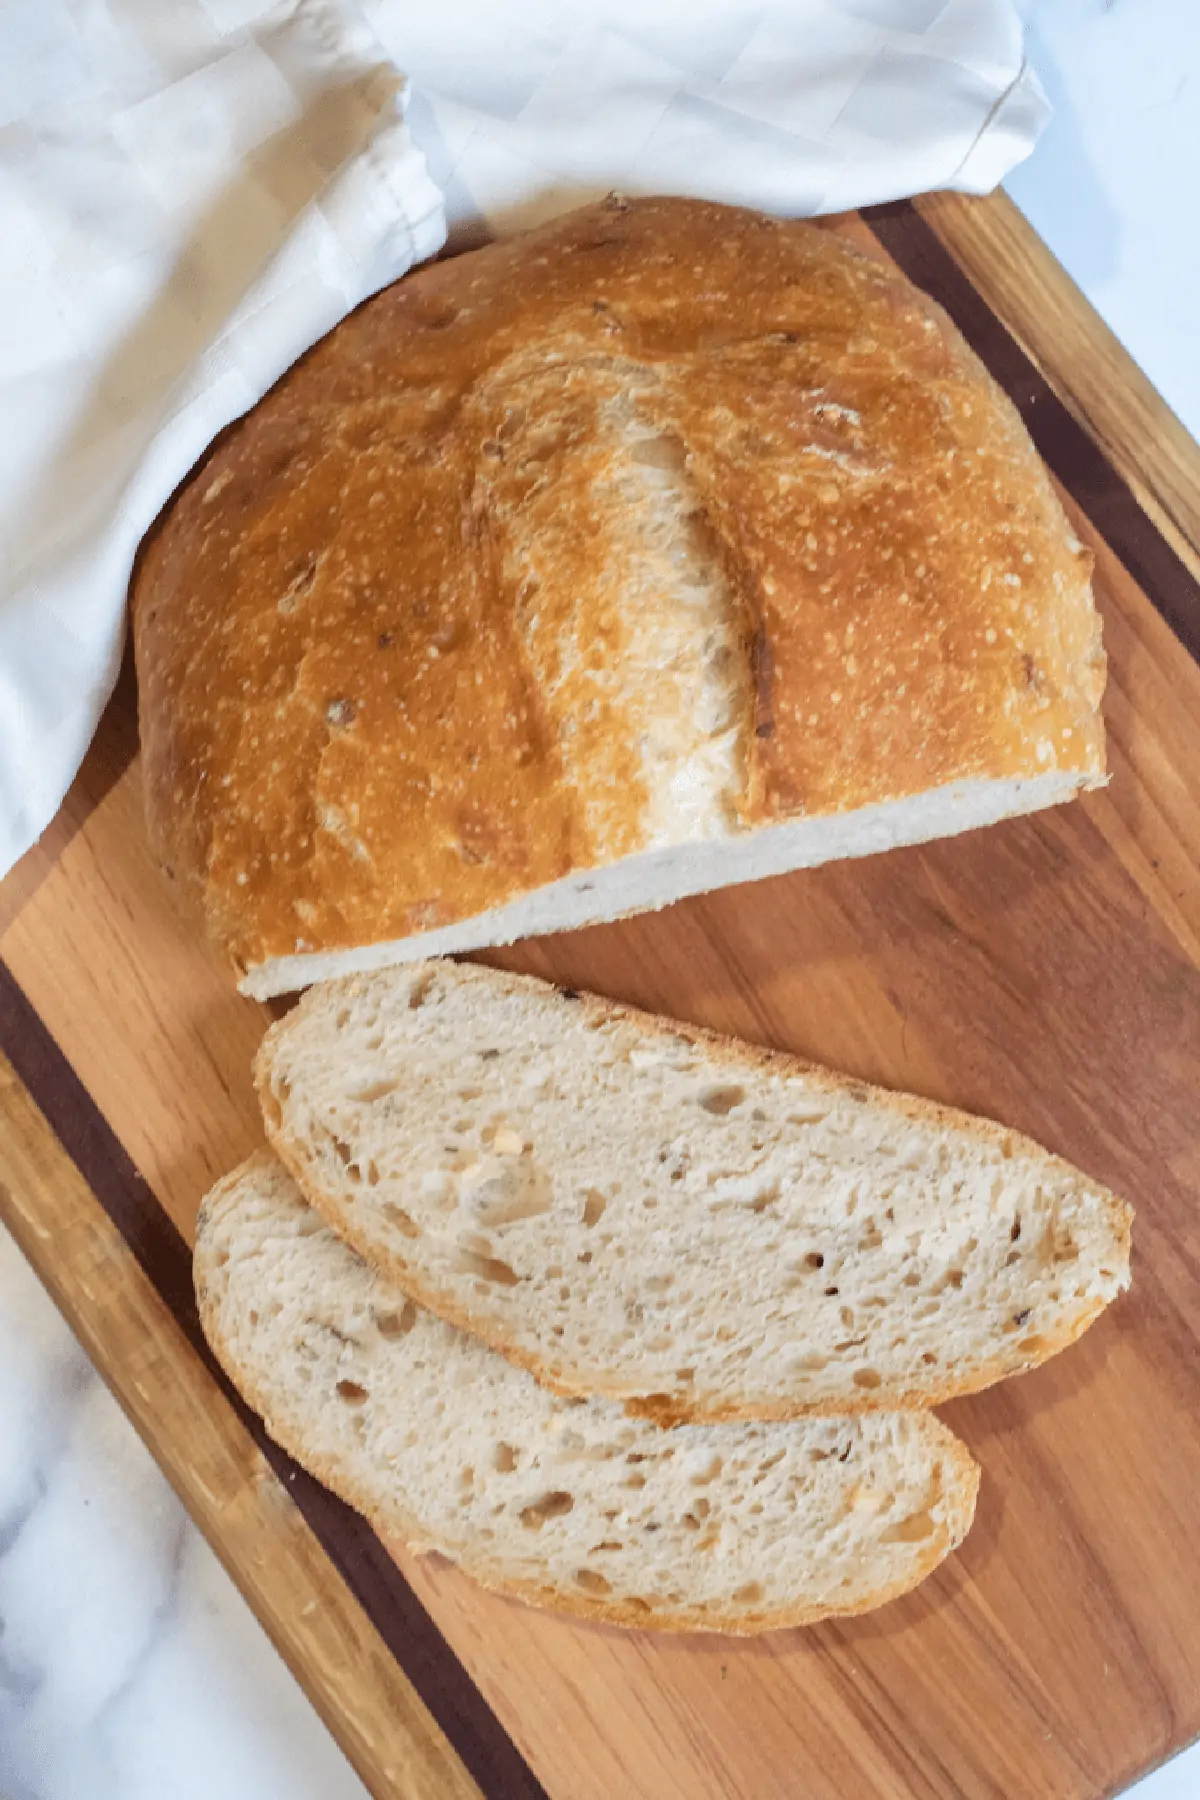
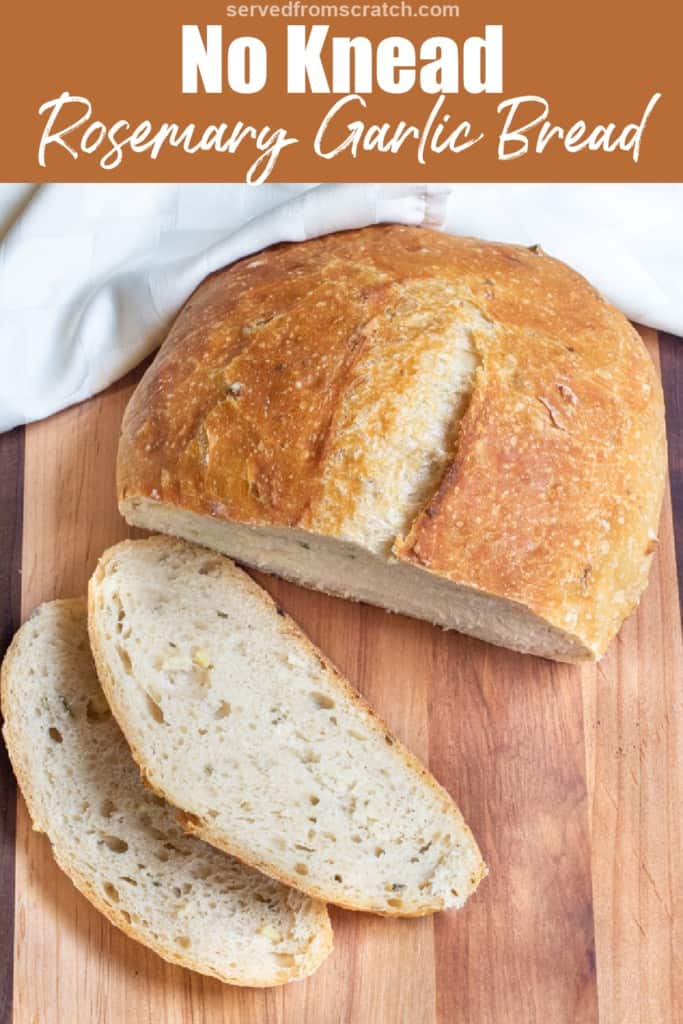
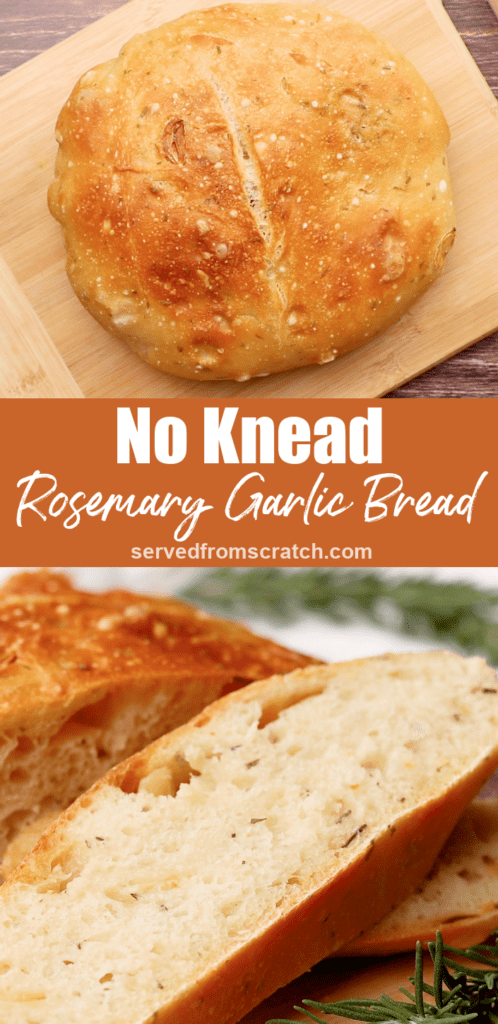
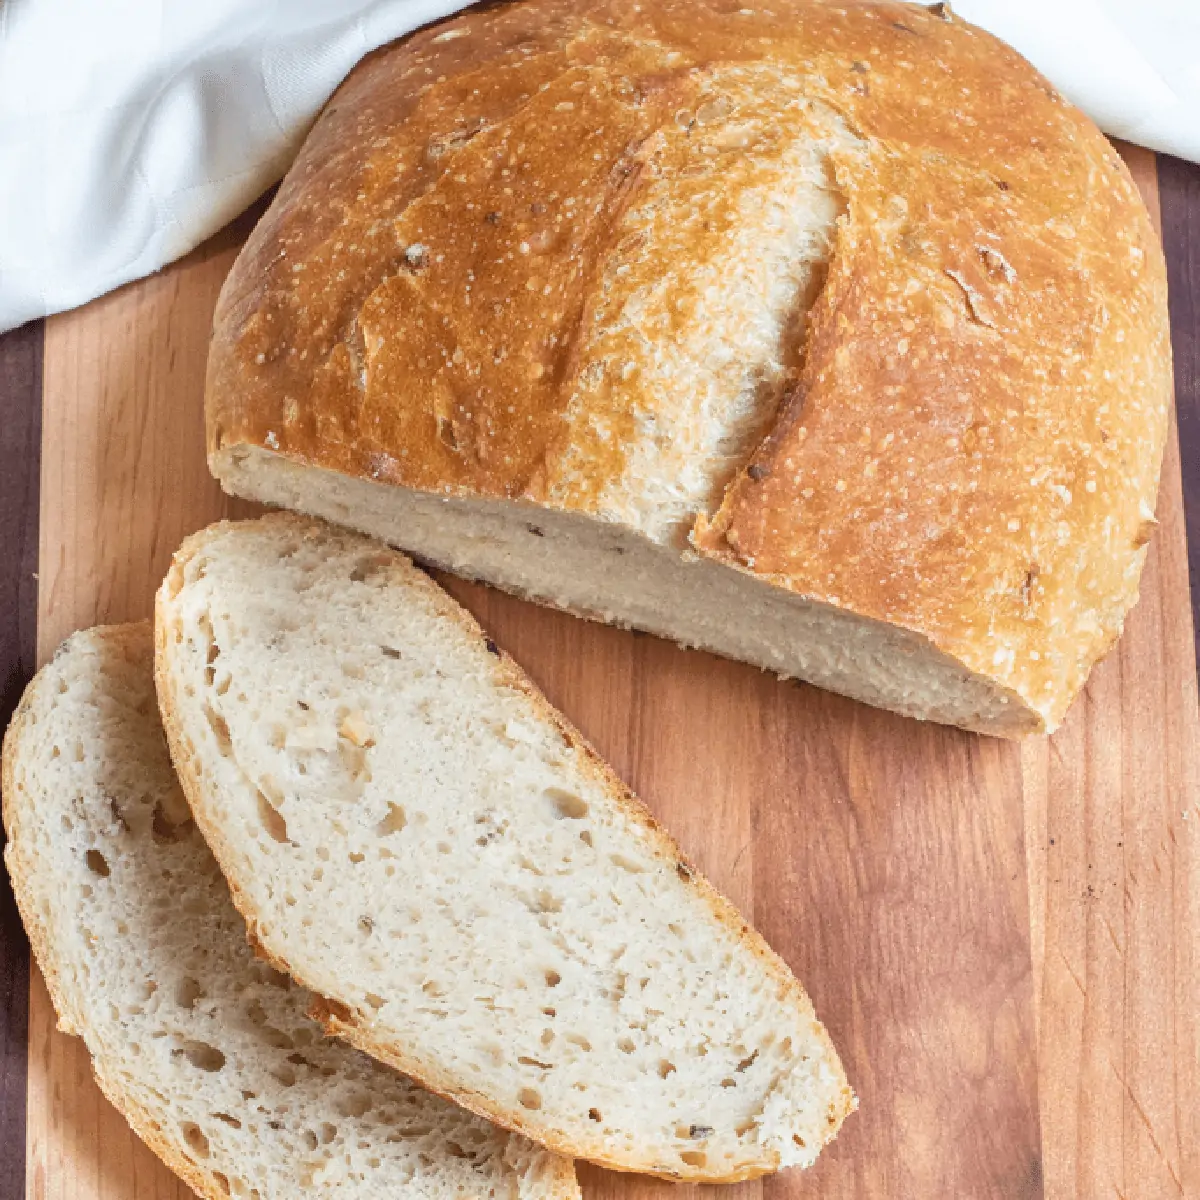
Who doesn't love a good Dutch Oven bread? When you want bread that looks artisan, pull out that Dutch oven!
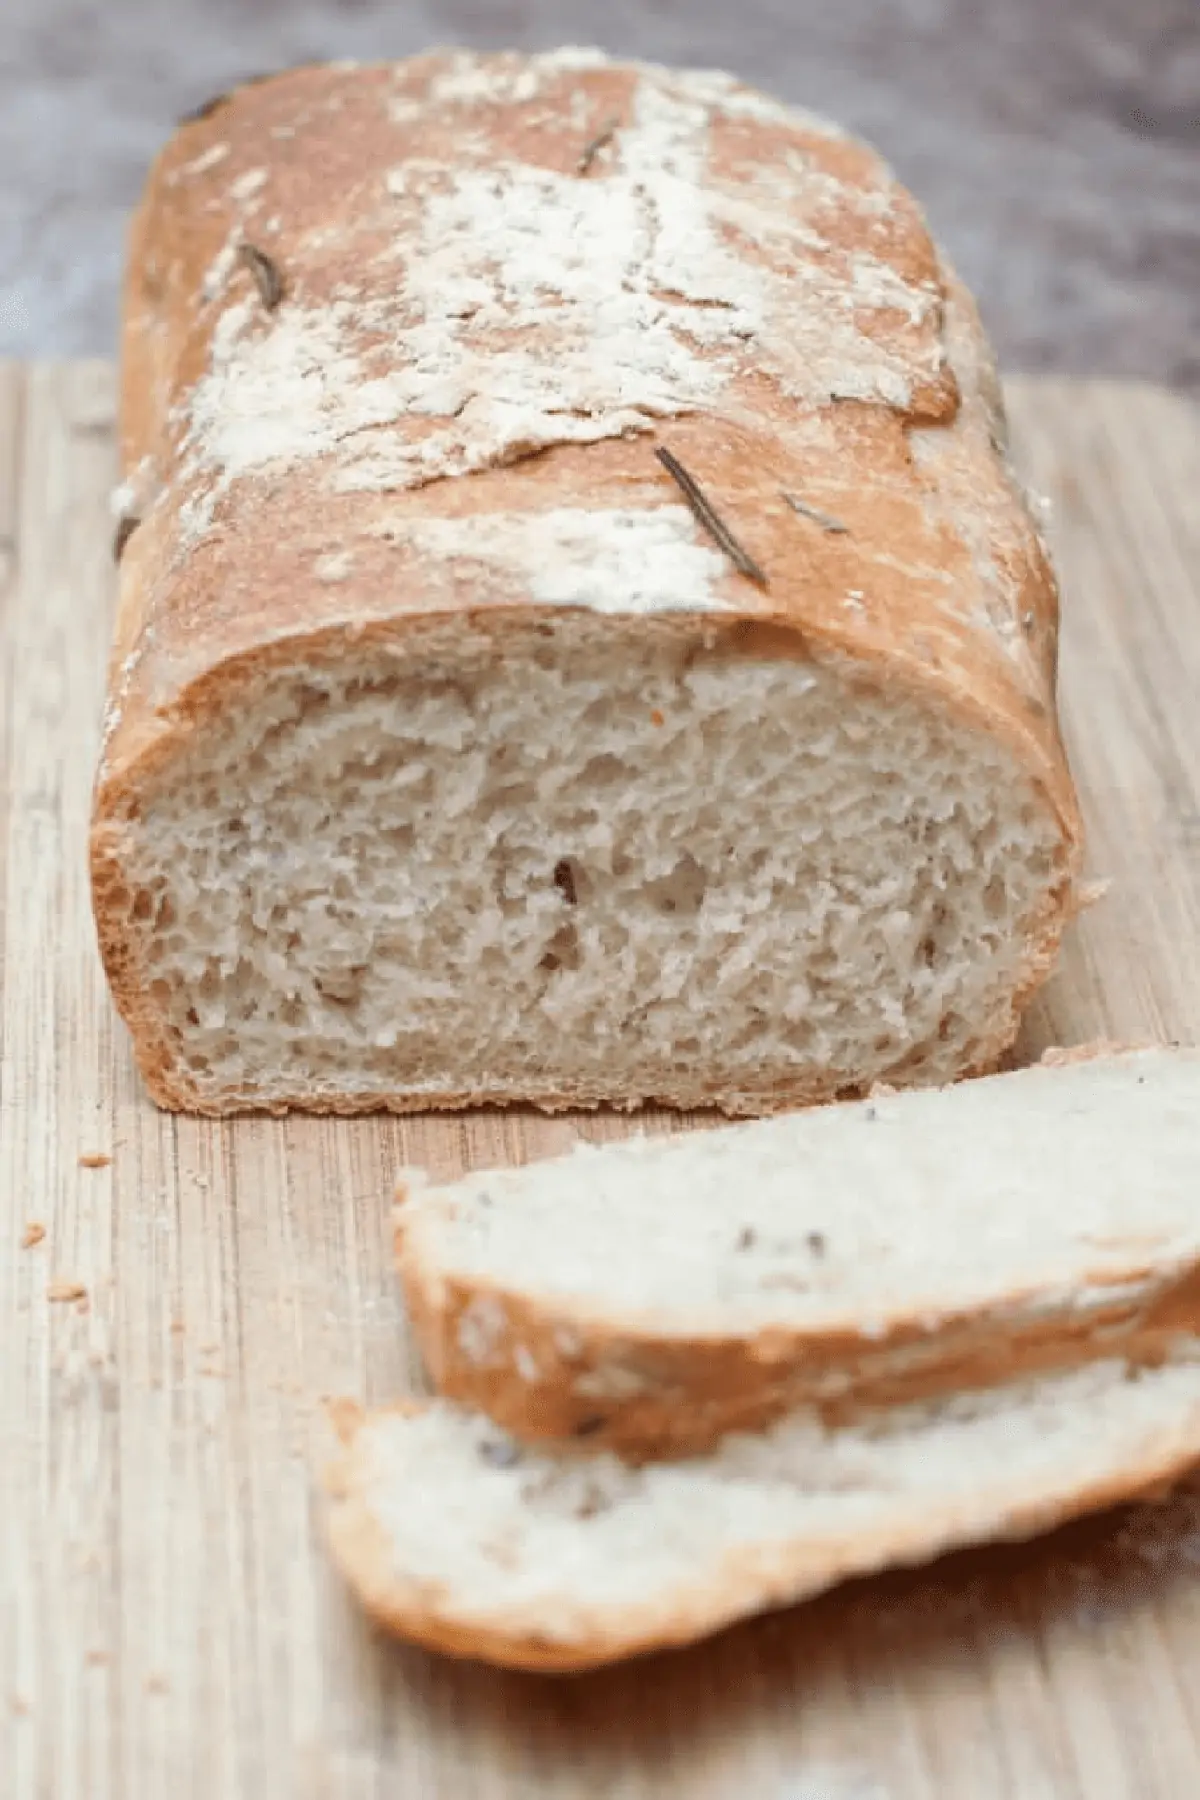
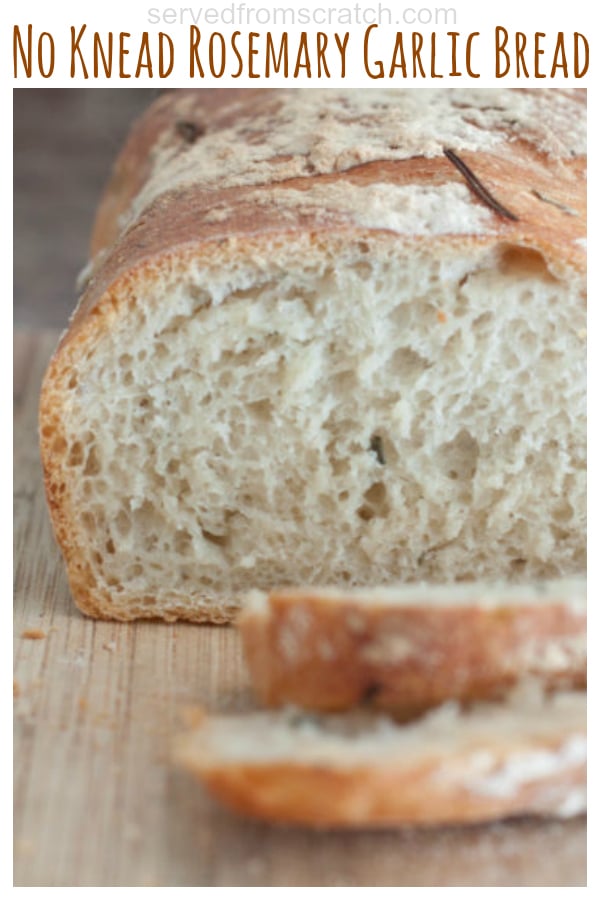
My favorite thing about this bread is how wonderfully crispy the crust is while the center is perfectly soft a chewy. Then of course the rosemary and garlic flavors? Amazing - and they are not subtle. It is an in-your-face rosemary and garlic bread!
We make this bread All. Of. The. Time. It is our go-to. The hardest part of it? Remembering to prep it! Which makes this bread is absolutely the perfect "gateway" homemade bread!
Other Homemade Breads
- Dan's Como Bread
- Homemade Hawaiian Sandwich Bread
- English Muffins From Scratch
- Copycat Dave's Killer Bread
- No Knead Rosemary Garlic Bread
- Easy White Sandwich Bread
- Whole Wheat Honey Oat Bread
- Easy Dinner Rolls From Scratch
- Easy Crusty French Baguette
- Homemade Irish Soda Bread
Enjoy! As always, if you make this recipe or any of my others, I love to hear what you think! Leave a comment below, email me, or you can find me on Facebook, Instagram, and Pinterest!
If you want to see more, be sure to sign up for my 5 Easy Ways to Start Cooking From Scratch!
No Knead Rosemary Garlic Bread
Equipment
Ingredients
- 3 cups all purpose flour 384 grams
- 1 1/3 cups warm water 307 grams
- 2 1/4 teaspoon instant yeast 12 grams
- 1 1/2 teaspoon kosher salt 10 grams
- 2 teaspoons fresh rosemary minced
- 5-6 garlic cloves whole, sliced, or minced
Instructions
- In a large bowl, add all ingredients except water and give a mix.
- Then add water and mix until everything is incorporated - but don't mix too much.
- Cover with plastic wrap and let rest/rise for at least 6 hrs and up to 12-14 hrs.
- In the morning, generously grease a loaf pan. Then lightly flour the edges of the bowl and then turn dough onto a floured surface and shape into a loaf shape and add to the loaf pan. Or just "pour" into the pan. Add additional fresh rosemary on top, if desired. Cover with towel and let rise for at least another 2 hrs.If using a Dutch oven, lined Dutch oven with parchment paper and then lightly flour the edges of the bowl and then turn dough onto a floured surface and shape into a boule or ball shape. Cover and let rise for another 2 hrs.
- Meanwhile, pre-heat oven to 450 degrees.
- After 2 hours and loaf has risen again, use a super sharp knife or bread lame and score top of bread with three slashes, or however you'd like.
- Loaf Pan: Bake for 35-40 minutes until edges are browned and bread sounds hallow to a tap to the bottom. Dutch Oven: Bake covered for 40 minutes. Remove lid and then bake another 15 minutes.
- Let cool for at least 1 hour. Slice and enjoy! If sliced too early, it can cause a gummy center.


Such an easy and delicious bread recipe to make.
My kids love it so much!
Hi Tracy! Thanks for this recipe! Question, when you let it rest up to 12 hours, is that on the counter or in fridge? thanks in advance.
Hi Rosalie! Thanks so much for asking - sorry that wasn't more clear! It should be at room temperature 🙂 Enjoy!
I’m always looking for lighter chicken recipes. This looks like a good one to try!
Harold Burton
I made this yesterday for Easter, used a lot more garlic, and one minced sprig of rosemary (didn't measure), everyone loved it and my father and husband were literally fighting over the leftovers! It was a HUGE hit, great recipe and it's SO EASY, I'll be able to make this any time, which is a good thing since it's so popular!
Amazing to hear!! Thank you so much for sharing!!
Tracy! I cannot thank you enough for this bread!!! I first made it exactly the way you did, in a bread pan, and it came out awesome!!! Then, as I like whole wheat flour a lot, I substituted 1/3 of the white flour for whole wheat, and added 1/2 t of yeast (instead of 1/4 - I might not have even needed that change, but just in case, since whole wheat flour is more dense...), and baked it - it came out exactly like the bread from my homeland's bakery (Ukraine), exactly the same texture and taste!!! You gave me a taste of home, and I thank you dearly! 🙂 And so easy! I shall never knead bread again! 🙂
Irene that just made my day!!! I’m so so so happy you got a taste of home from this, thank you so much for sharing that with me!!! ❤️
Hi! How do I use this recipe in a bread machine? Sorry if you have covered it and I missed it. I’ve never baked bread before and I bought a bread machine I want to start using 😁
I had two questions:
1) Are you supposed to chop the garlic cloves, or just put them in whole?
2) I use packets of yeast, and this recipe calls for less than 1 packet. Do you know if I can save the remaining yeast to use later?
Hi! 1. You can do either - whole or sliced. It all depends on what sized pieces of garlic you'd like! 2. Yes, you definitely can!
Can I use self-rising flour instead of regular flour?
Lori
Hi Lori! I haven't tried this recipe with self rising flour but my concern would be that it would over proof because of the additional leavening agents in the self-rising flour. Best to stick with regular flour for this one.
I bought a big bag of wheat flour for another recipe so have a lot of flour left over. Can your delicious-sounding rosemary garlic bread be made with that wheat flour (it's not "old")? If so, what adjustments would be needed. Thank you.
Is the dough supposed to be super sticky and mushy?